Form 위젯
- TextField는 단순히 하나의 텍스트 입력을 다루는데 반해서, Form은 그 자체로 입력 필드를 가지고 있지 않지만, FormField 위젯들을 그룹화하여 관리하며, 복잡한 유효성 검사와 보다 쉽게 할 수 있는 위젯
- 다른 위젯과 달리 Form 위젯은 자체적인 화면을 제공하지는 않으며,
사용자가 입력한 데이터의 유효성 검증, 데이터 관리 관련 기능을 제공함 - Form 위젯 내에서 TextFormField 위젯을 사용하여 각 데이터 입력을 받는 것이 일반적임
- Form 위젯 작성 방법은 다음과 같음
1. Form 위젯을 위한 GlobalKey를 만들어야 함.
GlobalKey는 FormState 전체에 액세스하는 데 사용되며, 이 객체는 폼 데이터의 유효성을 검사하고 저장하는 데 사용됨
final _formKey = GlobalKey<FormState>();
2. TextFormField 위젯들의 폼 컨트롤을 위젯을 Form 위젯으로 래핑하고, _formKey를 Form 위젯의 key 속성으로 설정
Form(
  key: _formKey,
  child: Column(
    children: [
      // 폼 컨트롤들
    ],
  ),
);
- TextFormField 위젯 또는 다른 폼 컨트롤을 Form 위젯에 추가합니다.
각 폼 컨트롤은 validator 함수와 선택적인 onSaved 함수를 가져야 함- validator 함수는 사용자가 폼을 제출할 때 호출되며, 입력이 유효한지 확인.
- 입력이 유효하지 않으면 validator는 오류 메시지를 포함하는 문자열을 반환해야 함.
- 입력이 유효하면 validator는 null을 반환해야 함.
- onSaved 함수는 폼이 저장될 때 호출되며 사용자가 입력한 값을 변수나 데이터 모델에 저장해야 함.
TextFormField(
  decoration: InputDecoration(
    labelText: 'Email',
  ),
  validator: (value) {
    if (value == null || value.isEmpty) {
      return '이메일을 입력하세요';
    }
    return null;
  },
  onSaved: (value) {
    _email = value;
  },
),
- 폼에 제출 버튼을 추가하고 폼 제출을 처리할 함수를 정의
- _submitForm 함수는 FormState 객체의 validate 메서드(_formKey.currentState!.validate())를 사용하여 폼 유효성을 검사하고
- FormState 객체의 save 메서드(_formKey.currentState!.save())를 사용하여 폼 데이터를 저장해야 함
- _formKey.currentState!에서 _formKey는 GlobalKey 객체이고, 여기에서 currentState는 FormState 객체임
- 해당 객체가 없지 않다는 것을 명시적으로 알려주기 위해 !(Exclamation mark)를 기재한 것임
- 폼 데이터가 유효하면 _submitForm 함수는 데이터를 의도한대로 처리하게 됨
main8.dart
더보기
import 'package:flutter/material.dart';

void main() {
  runApp(MyApp8());
}

class MyApp8 extends StatefulWidget {
  const MyApp8({super.key});

  @override
  State<MyApp8> createState() => _MyApp8State();
}

class _MyApp8State extends State<MyApp8> {
  // Form 위젯 만들어 보기
  final _formKey = GlobalKey<FormState>();
  String? _name = '';
  String _email = '';
  String _password = '';
  String _errorMessage = '';

  // 멤버 함수 만들어보기
  void _submitForm() {
    // 유효성 검사
    // UI 상태 변경
    // ---> 통신 요청

    print('_formKey.currentState!.validate() : ${_formKey.currentState!.validate()}');
    // _formKey.currentState! -> null이 아니다.
    if(_formKey.currentState!.validate()) {
      // TextFormField --> validator 호출 ---> 모두 통과 하면 true를 반환 한다.

      // 다음 단계 --> onSave 메서드를 실행 시킨다.
      _formKey.currentState!.save(); // 각각의 formfield onSaved 메서드 호출 됨
      setState(() {
        _errorMessage = ''; // 상태 변경 처리
        print('_name : $_name');
        print('_email : $_email');
        print('_password : $_password');

        // 통신 요청
        // http.get(~);
        // http.post(~);
        // 응답 받아서 화면 이동 처리, 메세지 던져 주기

      });
    } else {
      setState(() {
        _errorMessage = ' 필수값들을 입력하시오.';
      });
    }
  }

  @override
  Widget build(BuildContext context) {
    return MaterialApp(
      home: Scaffold(
        appBar: AppBar(
          title: Text('Form Example'),
        ),
        body: Container(
          padding: const EdgeInsets.all(16.0),
          // form 위젯들을 구분할 수 있는 키가 필요하다.
          child: Form(
            key: _formKey,
            child: Column(
              children: [
                TextFormField(
                  decoration: InputDecoration(
                    labelText: 'name',
                    errorStyle: TextStyle(color: Colors.blue, fontSize: 10),
                  ),
                  validator: (value) {
                    if (value == null || value.isEmpty) {
                      return '이름을 입력하세요';
                    }
                    return null;
                  },
                  // value 매개변수 값이 null이 될 수 있다.
                  // String 에 ? 옵셔널을 붙여야 한다.
                  onSaved: (value) {
                    // 또는 value 의 느낌표(!)는 강제 null 아니라고 명시 함
                    _name = value!;
                  },
                ),
                TextFormField(
                  decoration: InputDecoration(
                    labelText: 'email',
                    errorStyle: TextStyle(color: Colors.blue, fontSize: 10),
                  ),
                  validator: (value) {
                    if (value == null || value.isEmpty) {
                      return '이메일을 입력하세요';
                    }
                    return null;
                  },
                  // value 매개변수 값이 null이 될 수 있다.
                  // String 에 ? 옵셔널을 붙여야 한다.
                  onSaved: (value) {
                    // 또는 value 의 느낌표(!)는 강제 null 아니라고 명시 함
                    _email = value!;
                  },
                ),
                TextFormField(
                  decoration: InputDecoration(
                    labelText: 'password',
                    errorStyle: TextStyle(color: Colors.blue, fontSize: 10),
                  ),
                  validator: (value) {
                    if (value == null || value.isEmpty) {
                      return '비밀번호를 입력하세요';
                    }
                    return null;
                  },
                  // value 매개변수 값이 null이 될 수 있다.
                  // String 에 ? 옵셔널을 붙여야 한다.
                  onSaved: (value) {
                    // 또는 value 의 느낌표(!)는 강제 null 아니라고 명시 함
                    _password = value!;
                  },
                ),

                // 코드 축약 버전 onPress: () {}
                const SizedBox(height: 20),
                ElevatedButton(onPressed: _submitForm,
                    child: Text('Submit')),
                const SizedBox(height: 20),
                Text(
                  _errorMessage,
                  style: TextStyle(color: Colors.red),
                ),
              ],
            ),
          ),
        ),
      ),
    );
  }
}
Form 위젯 연습
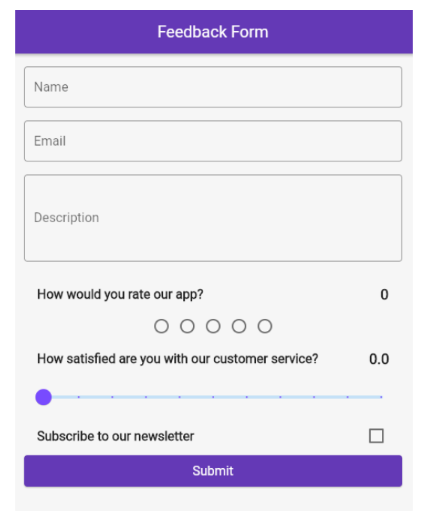
main9.dart
더보기
import 'package:flutter/material.dart';

void main() {
  runApp(FeedbackFormApp());
}

// 한 파일안에 여러개의 클래스를 만들 수 있다.

class FeedbackFormApp extends StatelessWidget {
  const FeedbackFormApp({super.key});

  @override
  Widget build(BuildContext context) {
    return MaterialApp(
      debugShowCheckedModeBanner: false,
      theme: ThemeData(
        useMaterial3: true,
        colorScheme: ColorScheme.fromSeed(seedColor: Colors.redAccent),
      ),
      home: FeedbackForm(),
    );
  }
}

// 상태 변경 가능한 UI 선언
class FeedbackForm extends StatefulWidget {
  const FeedbackForm({super.key});

  @override
  State<FeedbackForm> createState() => _FeedbackFormState();
}

class _FeedbackFormState extends State<FeedbackForm> {
  final _formKey = GlobalKey<FormState>(); // 폼 상태를 추적하기 위한 글로벌 키
  int _rating = 0;
  bool _subscribe = false;
  String _name = '';
  String _email = '';
  String _comments = '';
  String _successMessage = '';
  double _satisfaction = 0.0;

  @override
  Widget build(BuildContext context) {
    return SafeArea(
      child: Scaffold(
        appBar: AppBar(
          centerTitle: true,
          title: Text('FeedbackForm'),
          backgroundColor: Theme.of(context).colorScheme.primaryContainer,
        ),
        body: SingleChildScrollView(
          // formField 터치시 소프트 키보드가 올라 옴. 여백 공간 적절히 줘야 함
          padding: EdgeInsets.all(16.0),
          child: Form(
            key: _formKey,
            child: Column(
              children: [
                TextFormField(
                  decoration: InputDecoration(
                      labelText: '이름',
                      hintText: '홍길동',
                      border: OutlineInputBorder()),
                  validator: (value) {
                    // 입력 값 검증
                    if (value == null || value.isEmpty) {
                      return '이름을 입력해주세요.';
                    } else {
                      // 정상적으로 입력 했다면
                      return null;
                    }
                  }, // end of validator
                  onSaved: (value) {
                    _name = value!;
                  },
                ),
                const SizedBox(height: 16.0),
                TextFormField(
                  decoration: InputDecoration(
                      labelText: '이메일',
                      hintText: 'abc@naver.com',
                      border: OutlineInputBorder()),
                  validator: (value) {
                    // 입력 값 검증
                    if (value == null || value.isEmpty) {
                      return '이메일을 입력해주세요.';
                    } else {
                      // 정상적으로 입력 했다면
                      return null;
                    }
                  }, // end of validator
                  onSaved: (value) {
                    _email = value!;
                  },
                ),
                const SizedBox(height: 16.0),
                TextFormField(
                  maxLines: 4, // 여러줄 입력가능

                  decoration: InputDecoration(
                      labelText: '코멘트',
                      hintText: '경험을 공유해주세요',
                      border: OutlineInputBorder()),
                  validator: (value) {
                    // 입력 값 검증
                    if (value == null || value.isEmpty) {
                      return '코멘트를 입력해주세요.';
                    } else {
                      // 정상적으로 입력 했다면
                      return null;
                    }
                  }, // end of validator
                  onSaved: (value) {
                    _comments = value!;
                  },
                ),
                const SizedBox(height: 24),
                Text(
                  '우리 앱은 어떻게 평가하시겠습니까?',
                  style: TextStyle(
                      fontSize: 18,
                      fontWeight: FontWeight.bold,
                      color: Theme.of(context).colorScheme.primary),
                ),
                Row(
                  mainAxisAlignment: MainAxisAlignment.center,
                  children: List.generate(
                    5,
                    (index) {
                      return IconButton(
                        onPressed: () {
                          setState(() {
                            // 버그는 추후 수정
                            // 선택한 점수로 설정
                            _rating = index + 1; // index는 0 부터 시작해서
                          });
                        },
                        color: Colors.deepPurple,
                        icon: Icon(
                            _rating > index ? Icons.star : Icons.star_border),
                      );
                    },
                  ),
                ),
                const SizedBox(height: 24),
                Text(
                  '고객 서비스 만족도는 어느 정도입니까?',
                  style: TextStyle(
                      fontSize: 18,
                      fontWeight: FontWeight.bold,
                      color: Theme.of(context).colorScheme.primary),
                ),
                Slider(
                  value: _satisfaction,
                  min: 0,
                  max: 10,
                  onChanged: (value) {
                    setState(() {
                      print('value $value');
                      // _si = value;
                      _satisfaction = value;
                    });
                  },
                  divisions: 10,
                  // 슬라이더 구간 설정
                  label: '슬라이더 라벨값 설정 가능',
                ),
                const SizedBox(height: 16),
                SwitchListTile(
                  title: const Text('뉴스레터를 구독하시겠습니까?'),
                  value: _subscribe,
                  onChanged: (value) {
                    setState(() {
                      _subscribe = value;
                    });
                  },
                ),
                const SizedBox(height: 16),
                ElevatedButton(
                  onPressed: () {
                    if (_formKey.currentState!.validate()) {
                      // 통과
                      _formKey.currentState!.save(); // 실행
                      // 변수에 값 할당
                      setState(() {
                        _successMessage = '제출이 완료 되었습니다';
                      });
                    } else {
                      // 실패
                      setState(() {
                        _successMessage = '';
                      });
                    }
                  },
                  child: const Text('제출'),
                ),
                // 다트 문법 활용
                if (_successMessage.isNotEmpty)
                  Padding(
                    padding: EdgeInsets.symmetric(vertical: 16),
                    child: Text(
                      _successMessage,
                      style: TextStyle(
                          color: Theme.of(context).colorScheme.primary,
                          fontSize: 16
                      ),
                    ),
                  )
              ],
            ),
          ),
        ),
      ),
    );
  }
}
GlobalKey란 무엇인가요?
GlobalKey는 Flutter에서 위젯 트리 내에서 특정 위젯을 유일하게 식별할 수 있는 키입니다.
이 키를 사용하면 해당 위젯이나 그 상태(State)에 직접 접근하여 조작할 수 있습니다.
상태(State)란? 위젯이 현재 가지고 있는 데이터나 속성을 의미하며, 시간이 지남에 따라 변경될 수 있는 값입니다.
StatelessWidget VS StatefulWidget의 차이
StatelessWidget
- 정의
상태를 가지지 않는 위젯입니다.
내부에 데이터나 속성을 가질 수 있으나 내부에 변경 가능한 데이터나 속성이 없기 때문에
자체적으로 UI가 업데이트되지 않습니다. - 하지만(추가 설명)
- 외부로부터의 변화
StatelessWidget은 부모 위젯이나 외부에서 전달된 데이터가 변경되면 재빌드되어 UI가 업데이트될 수 있습니다. - 한정된 업데이트
하지만 자체적으로 상태를 관리하거나 변경하지 않으므로,
내부적인 상태 변화로 인한 UI 업데이트는 발생하지 않습니다.
- 외부로부터의 변화
StatefulWidget
- 정의: 상태(State)를 가지는 위젯입니다. 시간이 지남에 따라 상태가 변경될 수 있고, 이에 따라 UI도 업데이트됩니다.
- 추가 설명:
- 상태 관리
StatefulWidget은 State 객체를 통해 상태를 관리하며, 상태가 변경될 때마다
setState() 메서드를 호출하여 UI를 갱신합니다. - 독립성
자체적으로 상태를 관리하기 때문에,
외부의 변화뿐만 아니라 내부적인 상태 변화에도 대응할 수 있습니다.
- 상태 관리
GlobalKey의 주요 기능
- 위젯 식별: 동일한 타입의 위젯이 여러 개 있더라도, GlobalKey를 사용하면 특정 위젯을 구분할 수 있습니다.
- 상태 접근: StatefulWidget의 상태(State)에 직접 접근하여 값을 읽거나 변경할 수 있습니다.
- 위젯 위치 정보 얻기: 위젯의 위치나 크기 등의 정보를 얻어올 수 있습니다
ListView 사용법과 주요 property
- 가장 일반적으로 사용되는 스크롤 위젯
- ListView는 주로 다음과 같은 방식으로 사용
- 일반적인 ListView를 명시적으로 호출하고 children 전달하는 방법 (적은 데이터에 사용시 용이함)
- ListView.builder를 사용하여 동적으로 호출
- ListView.separated는 ListView.builder 기능에 구분선 사용 가능
- 주요 property
- reverse: true이면 bottom에서부터 리스트 표시
- padding: 리스트 아이템 간격 (EdgeInsets로 적용)
- itemCount: 동적 리스트 아이템 개수 (ListView.builder/ListView.separated에서 사용 가능)
- itemBuilder: 각 동적 리스트 아이템 정의 (ListView.builder/ListView.separated에서 사용 가능)
- physics: 스크롤 방식 설정
ListTile
- Material Design의 리스트 스타일 따르는 위젯
- ListView와 함께 사용하여, 일반적인 스크롤을 지원하는 리스트 메뉴를 표현

main10.dart
ListTile
더보기
import 'package:flutter/material.dart';

void main() {
  runApp(MyApp10());
}

class MyApp10 extends StatelessWidget {
  const MyApp10 ({super.key});

  @override
  Widget build(BuildContext context) {
    return MaterialApp(
      debugShowCheckedModeBanner: false,
      home: Scaffold(
        // ListView 안에 스크롤 뷰가 들어가 있다.
        body: ListView(
          padding: EdgeInsets.all(10.0),
          children: <Widget>[
            ListTile(
              leading: CircleAvatar(
                backgroundColor:  Colors.amber,
                child: Text('1'),
              ),
              title: Text('item 1'),
              subtitle: Text('item description'),
              trailing: IconButton(icon: Icon(Icons.more_vert), onPressed: () {
                print('Click');
              },),
            ),

            ListTile(
              leading: CircleAvatar(
                backgroundColor:  Colors.amber,
                child: Text('1'),
              ),
              title: Text('item 1'),
              subtitle: Text('item description'),
              trailing: IconButton(icon: Icon(Icons.more_vert), onPressed: () {
                print('Click');
              },),
            ),            ListTile(
              leading: CircleAvatar(
                backgroundColor:  Colors.amber,
                child: Text('1'),
              ),
              title: Text('item 1'),
              subtitle: Text('item description'),
              trailing: IconButton(icon: Icon(Icons.more_vert), onPressed: () {
                print('Click');
              },),
            ),

            ListTile(
              leading: CircleAvatar(
                backgroundColor:  Colors.amber,
                child: Text('1'),
              ),
              title: Text('item 1'),
              subtitle: Text('item description'),
              trailing: IconButton(icon: Icon(Icons.more_vert), onPressed: () {
                print('Click');
              },),
            ),

          ],

        ),
      ),
    );
  }
}
main11.dart
ListView.builder 사용 해보기
더보기
import 'package:flutter/material.dart';

void main() {
  runApp(MyApp11());
}

class MyApp11 extends StatelessWidget {
  const MyApp11({super.key});

  @override
  Widget build(BuildContext context) {
    return MaterialApp(
      debugShowCheckedModeBanner: false,
      home: Scaffold(
        // ListView 안에 스크롤 뷰가 들어가 있다.
        body: ListView.builder(
          physics: ClampingScrollPhysics(), // 물리적인 스크롤 방식
          itemCount: 20, // 이게 1 ~ 19까지 나온다. 이거 없으면 무한 스크롤
          itemBuilder: (context, index) {
            return ListTile(
              leading: CircleAvatar(
                backgroundColor: Colors.amber,
                child: Text(index.toString()),
              ),
              title: Text('Item $index'),
              subtitle: Text('sub Item $index'),
            );
          },
        ),
      ),
    );
  }
}

main12.dart
ListView.separated 사용 해보기
더보기
import 'package:flutter/material.dart';

void main() {
  runApp(MyApp12());
}

class MyApp12 extends StatelessWidget {
  const MyApp12({super.key});

  @override
  Widget build(BuildContext context) {
    return MaterialApp(
      debugShowCheckedModeBanner: false,
      home: Scaffold(
        // ListView 안에 스크롤 뷰가 들어가 있다.
        body: ListView.separated(
          physics: ClampingScrollPhysics(), // 물리적인 스크롤 방식
          itemCount: 20, // 이게 0 ~ 19까지 나온다. 이거 없으면 무한 스크롤
          itemBuilder: (context, index) {
            return ListTile(
              leading: CircleAvatar(
                backgroundColor: Colors.amber,
                child: Text(index.toString()),
              ),
              title: Text('Item $index'),
              subtitle: Text('sub Item $index'),
            );
          },
          separatorBuilder: (context, index) {
            return const Divider(
            indent: 20.0,
              endIndent: 20.0,

            );
          },
        ),
      ),
    );
  }
}

'Flutter' 카테고리의 다른 글
| 2024. 11. 12 플러터 기본기 다지기 - 3 (0) | 2024.11.12 |
|---|---|
| 2024. 11 .11 플러터 기본기 다지기 - 3 (2) | 2024.11.11 |
| 2024.11.07 플러터 기본기 다지기 - 2 (폰트 설정, 로컬 이미지) (2) | 2024.11.07 |
| 2024.11.07 flutter 플러터 기본기 다지기 - 1 (0) | 2024.11.07 |
| 2024.11.06 Flutter 플러터 기본기 다지기 - 1 (0) | 2024.11.06 |