학습 목표
1. SpringSecurityCrypto 의존성 추가 및 BCryptPasswordEncoder 빈 클래스로 등록
2. 회원가입 시 회원 비밀번호 암호화 처리
3. 로그인 시 암호호 된 비번 확인 및 기능 추가
4. 코드 확인
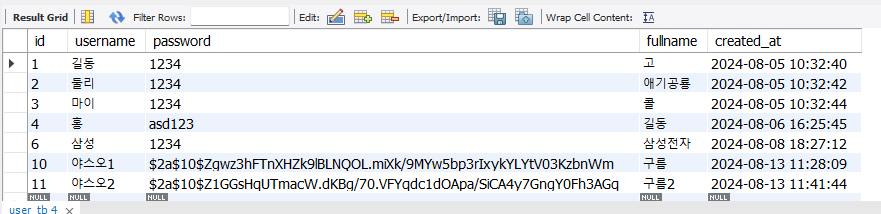
* 암호화 처리 후 H2 초기 데이터로 들어간 유저로는 로그인이 안됩니다
패스워드 확인 로직인 변경 됨, 신규 유저 가입 후 테스트 해주세요
마이그레이션이란?
데이터베이스 스키마의 변경 내역을 버전 관리하여, 변경에 대한 이력을 남기고,
데이터베이스를 이전 버전에서 최신 버전으로 옮기는 일련에 과정들을 의미합니다.
즉, 일반적으로 마이그레이션은 스키마를 변경하거나 새로운 테이블이나 컬럼을 추가하는 등에 작업을 포함하고 따라서 우리가 할 작업 H2 데이터베이스에서 MySQL 로 변경할 때도 마이그레이션을 수행 한다고 할 수 있습니다. 이러한 이경우에 테이터 스키마를 변경하거나 데이터를 이전하는 작업등이 포함 될 수 있습니다.
- 로그인 시 암호호 된 비번 확인 및 기능 추가
- username 으로 조회 하는 기능을 추가 합니다.
- 로그인시에 암화화 되어 있는 password와 사용자가 던지 값을 비교 하는 기능을 추구 합니다
주의 : spring-security 에서 제공하는 crypto라는 라이브러리를 활용합니다. 이번 프로젝트에서는 Spring Security를 활용하지 않습니다
Spring Security Crypto
org.springframework.security:spring-security-crypto 모듈은 스프링 시큐리티 프레임워크의 일부로, 암호화와 해싱을 위한 기능을 제공합니다. 이 모듈은 비밀번호 저장, 데이터 암호화 및 디지털 서명을 위한 API를 포함하며, 개발자가 보안 관련 작업을 보다 쉽게 구현할 수 있도록 돕습니다. 주로 사용되는 기능은 비밀번호 인코딩(해싱)과 텍스트 데이터의 암호화/복호화입니다.
의존성 추가 하기 - gradle 파일에 추가 후 새로 고침
// 암호화
implementation 'org.springframework.security:spring-security-crypto'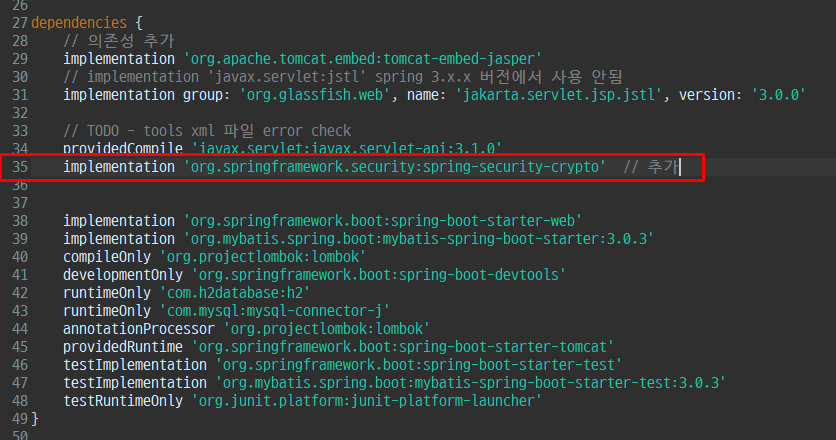
application.yml
데이터베이스를 H2에서 mysql로 변경한다.
더보기
application.yml
datasource:

    url: jdbc:mysql://localhost:3306/mybank?serverTimeZone=Asia/Seoul
    driver-class-name: com.mysql.cj.jdbc.Driver
    username: root # 사용자 ID를 지정
    password: asd123 # DB 비밀번호 여기서는 빈 문자열로 설정

#    url: jdbc:h2:mem:bankdb;MODE=MySQL # 데이터베이스 연결을 위한 URL을 설정 합니다.
#    driver-class-name: org.h2.Driver # 드라이버 클래스를 설정합니다.
#    username: sa # 사용자 ID를 지정
#    password: '' # DB 비밀번호 여기서는 빈 문자열로 설정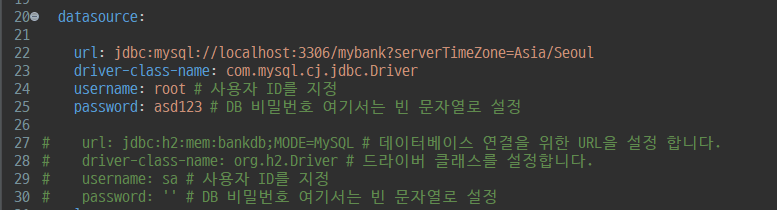
주요 import 확인
import org.springframework.security.crypto.bcrypt.BCryptPasswordEncoder;
import org.springframework.security.crypto.password.PasswordEncoder;
WebMvcConfig - 코드 추가 (PasswordEncoder Bean 처리)
더보기
WebMvcConfig.java
package com.tenco.bank.config;

import org.springframework.beans.factory.annotation.Autowired;
import org.springframework.context.annotation.Bean;
import org.springframework.context.annotation.Configuration;
import org.springframework.security.crypto.bcrypt.BCryptPasswordEncoder;
import org.springframework.security.crypto.password.PasswordEncoder;
import org.springframework.web.servlet.config.annotation.InterceptorRegistry;
import org.springframework.web.servlet.config.annotation.WebMvcConfigurer;

import com.tenco.bank.handler.AuthInterceptor;

import lombok.RequiredArgsConstructor;

@Configuration // 하나 이상의 bean을 등록
@RequiredArgsConstructor // 생성자 대신에 사용할 수 있음
public class WebMvcConfig implements WebMvcConfigurer {
	// implements WebMvcConfigurer : 설정 파일로 사용할 수 있다.

	@Autowired // DI
	private final AuthInterceptor authInterceptor; // final 사용하면 @Autowired 사용못함

	// @RequiredArgsConstructor // 생성자 대신에 사용할 수 있음

	// 우리가 만들어 놓은 AuthInterceptor를 등록해야 함.
	@Override
	public void addInterceptors(InterceptorRegistry registry) {
		registry.addInterceptor(authInterceptor)
				.addPathPatterns("/account/**") // /account 뒤에 있는 모든 디렉토리 파일을 의미한다.
				.addPathPatterns("/auth/**");

	} // end of addInterceptors()

	@Bean // IOC 대상 (싱글톤 처리)
	PasswordEncoder passwordEncoder() { // 회원가입 기능에 DI 해야한다. --> @bean 사용
		return new BCryptPasswordEncoder(); // 회원가입할 때 비밀번호 암호화
	}


}
2. 회원가입 시 회원 비밀번호 암호화 처리
UserService.java
더보기
UserService
/**
	 * 회원 등록 서비스 기능
	 * 트랜잭션 처리
	 * @param dto
	 */
	@Transactional // 트랜잭션 처리는 반드시 습관화
	public void createUser(SignUpDTO dto) {

		int result = 0;
		try {

			// 코드 추가 부분
			// 회원 가입 요청시 사용자가 던진 비밀번호 값을 암호화 처리 해야 함
			String hashPwd = passwordEncoder.encode(dto.getPassword()); // dto에서 패스워드를 가지고온다.
			System.out.println("hashPwd : " + hashPwd);
			dto.setPassword(hashPwd); // set으로 값을 변경 후 값 덮어쓰기

			System.out.println("11111111111");
			result = userRepository.insert(dto.toUser());

		} catch (DataAccessException e) {
			throw new DataDeliveryException("중복된 이름을 사용할 수 없습니다. ", HttpStatus.INTERNAL_SERVER_ERROR);
		} catch (Exception e) {
			e.printStackTrace();
			throw new RedirectException("알 수 없는 오류", HttpStatus.SERVICE_UNAVAILABLE);
		}
		if(result != 1) {
			throw new DataDeliveryException("회원가입 실패", HttpStatus.INTERNAL_SERVER_ERROR);
		}
	}
3. 로그인 시 암호호 된 비번 확인 및 기능 추가
UserRepository.java
더보기
UserRepository.java
package com.tenco.bank.repository.interfaces;

import java.util.List;

import org.apache.ibatis.annotations.Mapper;
import org.apache.ibatis.annotations.Param;

import com.tenco.bank.repository.model.User;


// 마이바티스 설정 확인

// UserRepository 인터페이스와 user.xml 파일을 매칭 시킨다.

@Mapper // 반드시 선언을 해야 동작한다.
public interface UserRepository {
	// 유저와 관련된 기능들을 설정한다.

	public int insert(User user);
	public int updateById(User user);
	public int deleteById(Integer id);
	public User findById(Integer id);
	public List<User> findAll();

	// 로그인 처리 기능 X (username, password)를 받아서 유저가 맞는지 확인하는 기능 없다.
	// 주의 ! -- @Mapper를 통해 xml이랑 연결된다.
	// 주의 ! -- 매개변수 2개 이상 시 반드시 @Param 어노테이션을 사용해야 한다.
	public User findByUsernameAndPassword(@Param("username") String username, @Param("password") String password);


	// 코드 추가
	public User findByUsername(@Param("username") String username);
}
user.xml
더보기
user.xml
<select id="findByUsername" resultType="com.tenco.bank.repository.model.User" >
		select * from user_tb where username = #{username}
	</select>
UserService.java
더보기
UserService.java
public User readUser(SignInDTO dto) {
		// 유효성 검사는 Controller 에서 먼저 하자.
		User userEntity = null; // 지역 변수 선언

		// 기능 수정
		// username 으로만 가지고 --> select
		// 2가지의 경우의 수 --> 객체가 존재하거나 null이 떨어지거나

		// 객체안에 사용자의 password 가 존재 한다. (암호화가 되어있다.)

		// passwordEncoder 안에 matches() 메서드를 사용해서 판별한다. ex) "1234".equals(@!#@!RFDFS@#!#@FGG);

		try {
			userEntity = userRepository.findByUsername(dto.getUsername());
		} catch (DataAccessException e) {
			throw new DataDeliveryException("잘못된 처리 입니다.", HttpStatus.INTERNAL_SERVER_ERROR);
		} catch (Exception e) {
			// TODO: handle exception
			throw new RedirectException("알수없는 오류", HttpStatus.SERVICE_UNAVAILABLE);
		}

		// 아이디와 패스워드중에 하나 틀렸을 때
		if(userEntity == null) {
			throw new DataDeliveryException("존재하지 않는 아이디 입니다.", HttpStatus.BAD_REQUEST);
		}

		boolean isPwdMatched = passwordEncoder.matches(dto.getPassword(), userEntity.getPassword());
		if(isPwdMatched == false) {
			throw new DataDeliveryException("비밀번호가 틀렸습니다.", HttpStatus.BAD_REQUEST);
		}


		return userEntity;
	}
'Spring boot' 카테고리의 다른 글
| 2024.08.14 Bank App 만들기 파일 업로드 - 2단계(ResourceHandler 사용) -29 (0) | 2024.08.14 |
|---|---|
| 2024.08.13 Bank App 만들기 파일 업로드 - 1 단계(멀티파트가 뭘까?) -28 (0) | 2024.08.13 |
| 2024.08.13 Bank App 만들기 intercepter 활용(인증검사 공통 처리) -26 (0) | 2024.08.13 |
| 2024.08.12 Bank App 만들기 계좌 상세보기 페이징 처리 -25 (0) | 2024.08.12 |
| 2024.08.12 Bank App 만들기 간단한 유틸 클래스 만들어 보기 -24 (0) | 2024.08.12 |